How to Connect Your Booking Website to Your Own Domain
Already have a domain you would like to use? Great news! You can now connect it to your new Booking website. This guide will walk you through the process step by step, making it easy even if you're not familiar with DNS settings.
Before You Start
Before you get started, make sure you have access to your domain provider's settings (such as AWS, Vercel, GoDaddy, or similar providers). Keep this information handy as you'll need it during the setup process.
Important Note: If you already have a website live on that domain, it will be replaced by your Direct Booking website once this process is complete. Make sure you're ready for this change before proceeding.
Step-by-Step Guide to Connect Your Domain
Step 1: Initiate the Process in Your Holidu Application
Start by accessing your Holidu booking website configuration. Here's what you need to do:
- Click on "Enable website" if it's not already enabled
- Click on "Connect my domain"
- Enter your existing domain name
Once you complete these steps, a DNS tab will appear showing specific DNS values that Holidu has generated for you.

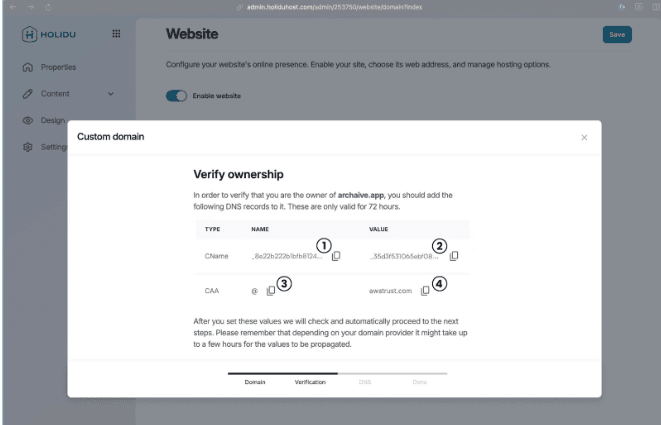
Tip: Don't worry if you're not familiar with DNS settings. We'll guide you through each step! Make sure to copy the values from the DNS tab accurately, as you'll need them in the next steps.
Step 2: Create a CNAME Record in Your Domain Settings
Now it's time to access your domain provider's settings. Log in with your domain provider and look for an option to create a new DNS record. Here's how to fill it in:
- For the "Type" field, select CNAME
- Copy the "NAME" value from the CNAME line in Holidu and paste it into the name field of your new DNS record
- Copy the "VALUE" from the same CNAME line in Holidu and paste it into the value field
- Leave the "TTL" and "Routing policy" fields with their default values
- Create the record
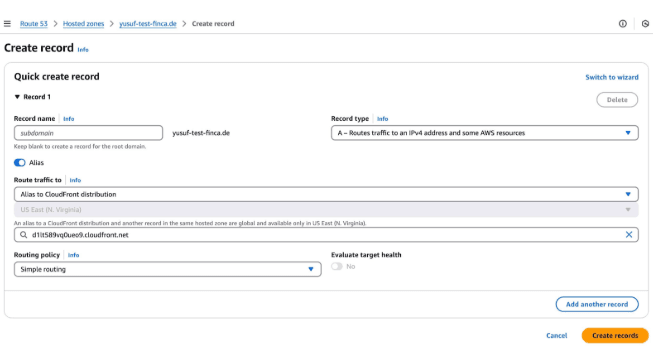
Example using AWS:
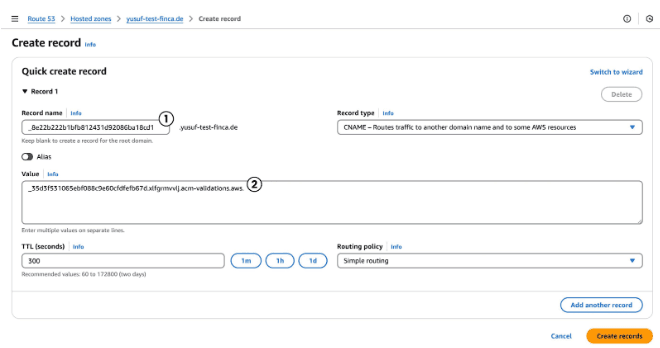
Important: If there are already records saved for the domain you want to use, please delete those first. This will disconnect your existing website from the domain, which is necessary to connect your new Direct Booking Website.
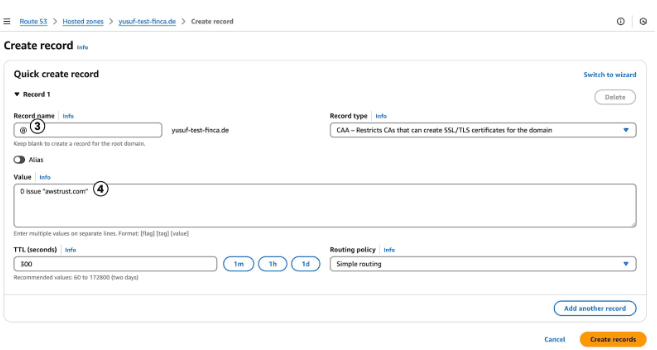
Step 3: Add a CAA DNS Record in Your Domain Settings
Next, create another DNS record for certification authority authorization. Follow these steps:
- For the "Type" field, select CAA
- Copy the "NAME" value from the CAA line in Holidu and paste it into the name field of your new record
- Copy the "VALUE" from the CAA line in Holidu and paste it into the value field
- If your domain provider requires a special format (for example: 0 issue "letsencrypt.org"), add the value in quotation marks as instructed by your provider
- Keep the "TTL" and "Routing policy" fields as their default values
- Create the record
Example using AWS:
Step 4: Verify Your Records in the Holidu Application
Return to your Holidu application and let the system check your DNS settings. Holidu will automatically verify the records you just created.
This process usually takes around 5 minutes. Be patient as the system works to recognize your new DNS records.
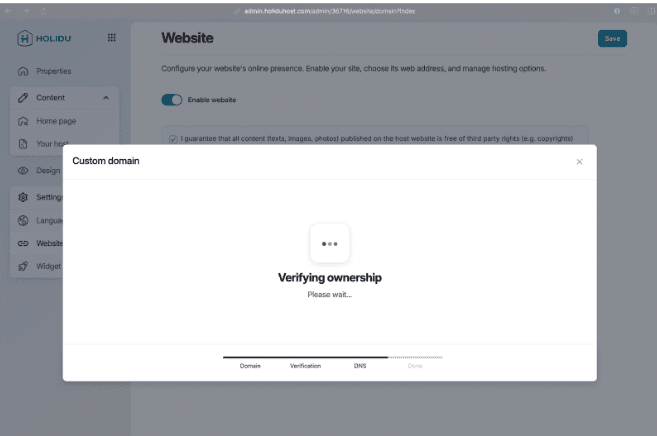
If everything is configured correctly, your domain will be verified and you'll be guided to the final step of the setup.
Step 5: Add an ALIAS DNS Record in Your Domain Settings
After Holidu verifies your domain, there's just one more DNS record to add. Holidu will provide you with the specific value you need:
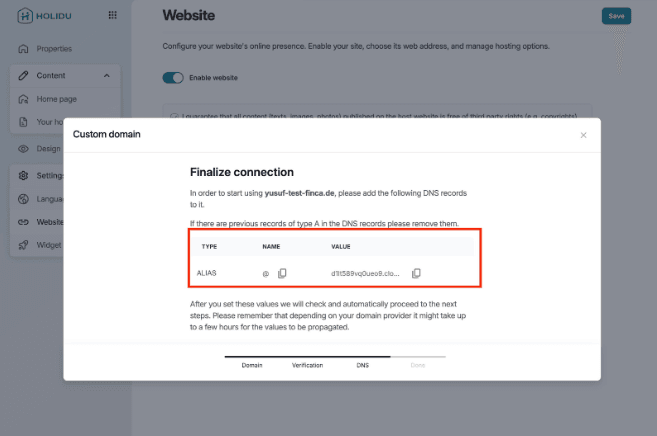
In your domain provider's settings:
- Create a new DNS record
- Change the Type to ALIAS
- Copy the Value provided by Holidu and paste it into the Value field in your domain provider's settings
- Create the record
Verification Checklist: Before moving to the final step, make sure your domain provider settings now include all three of these records:
- ALIAS
- CAA
- CNAME
All three are essential for your Direct Booking website to connect properly to your domain.
Step 6: Final Verification
Return to your Holidu admin interface and wait for the final domain verification. Holidu will automatically check everything you have set up. This may take a couple of minutes.
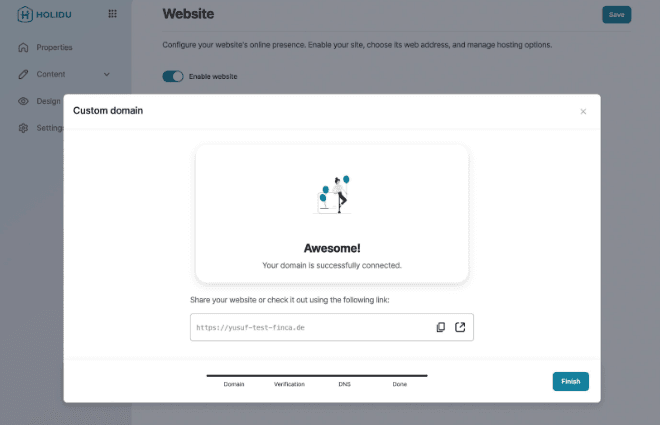
Congratulations! You can now access your Direct Booking Website using your own custom domain. Your booking website is live and ready to receive reservations from your customers.
Troubleshooting Tips
If you encounter issues during the domain connection process, keep these tips in mind:
- DNS changes can take 5-15 minutes to propagate, so be patient after creating each record
- Double-check that you've copied the exact values from Holidu into your domain provider's settings
- Ensure all three DNS records (ALIAS, CAA, and CNAME) are properly created before final verification
- If you have multiple records for the same domain, you may need to delete the old ones first
- Contact your domain provider if you're unsure where to create DNS records
Need More Help?
If you need additional assistance connecting your domain or have questions about the process, our support team is here to help. Don't hesitate to reach out through the Holidu help center for further guidance.
Do you want to contact us?
We’re here to help. You can contact us directly if you need assistance or have questions.
Contact us